I wanted to believe that the 1911 was the end all. But, I always found myself spending more time shooting the Glock than the Wilson. At 22 years old, and a young 11B, I wasn't an ideal candidate for a 1911. Truth be told, almost a decade later and having been issued a 1911 or a Glock my whole pistol-toting time in the Army, I'm still not.
Sure, I can legitimately maintain one now (thanks to LAV), I can shoot one well, and I love the craftsmanship and heritage that goes into a quality 1911. They have soul as people like to say. But, I am a realist; plus I like shooting my guns more than cleaning or maintaining them.
[Note: Please welcome guest author Jon C., an active duty US Army Special Forces soldier. This article was first published by Grey Group Training. We present it here with permission, slightly expanded and with photography.] more
[singlepic id=4083 w=500]Put yourself in a scenario where you've been forced to use your pistol and have fired 7 rounds. And then another target appears. What's faster, reloading under extreme stress or just pulling the trigger again...10 MORE TIMES? (thanks to Bob M. for that one) The Glock is the gun for me.
I have recently been witness to a host of issues with the Glock handgun by some of my more uneducated peers, and have seen countless examples of bad advice given by "the internet" on what makes a reliable duty trigger. Contrary to popular belief, not every commando is a gun guy. An even smaller fraction of commando gun guys are knowledgeable firearms professionals, not just people who like guns. My goal here is to break the trigger down into it's separate components, to understand how modifying each one can change the characteristics of the trigger (and gun as a whole), and give people the tools to pick a safe, reliable combination of components that will provide the performance they desire.
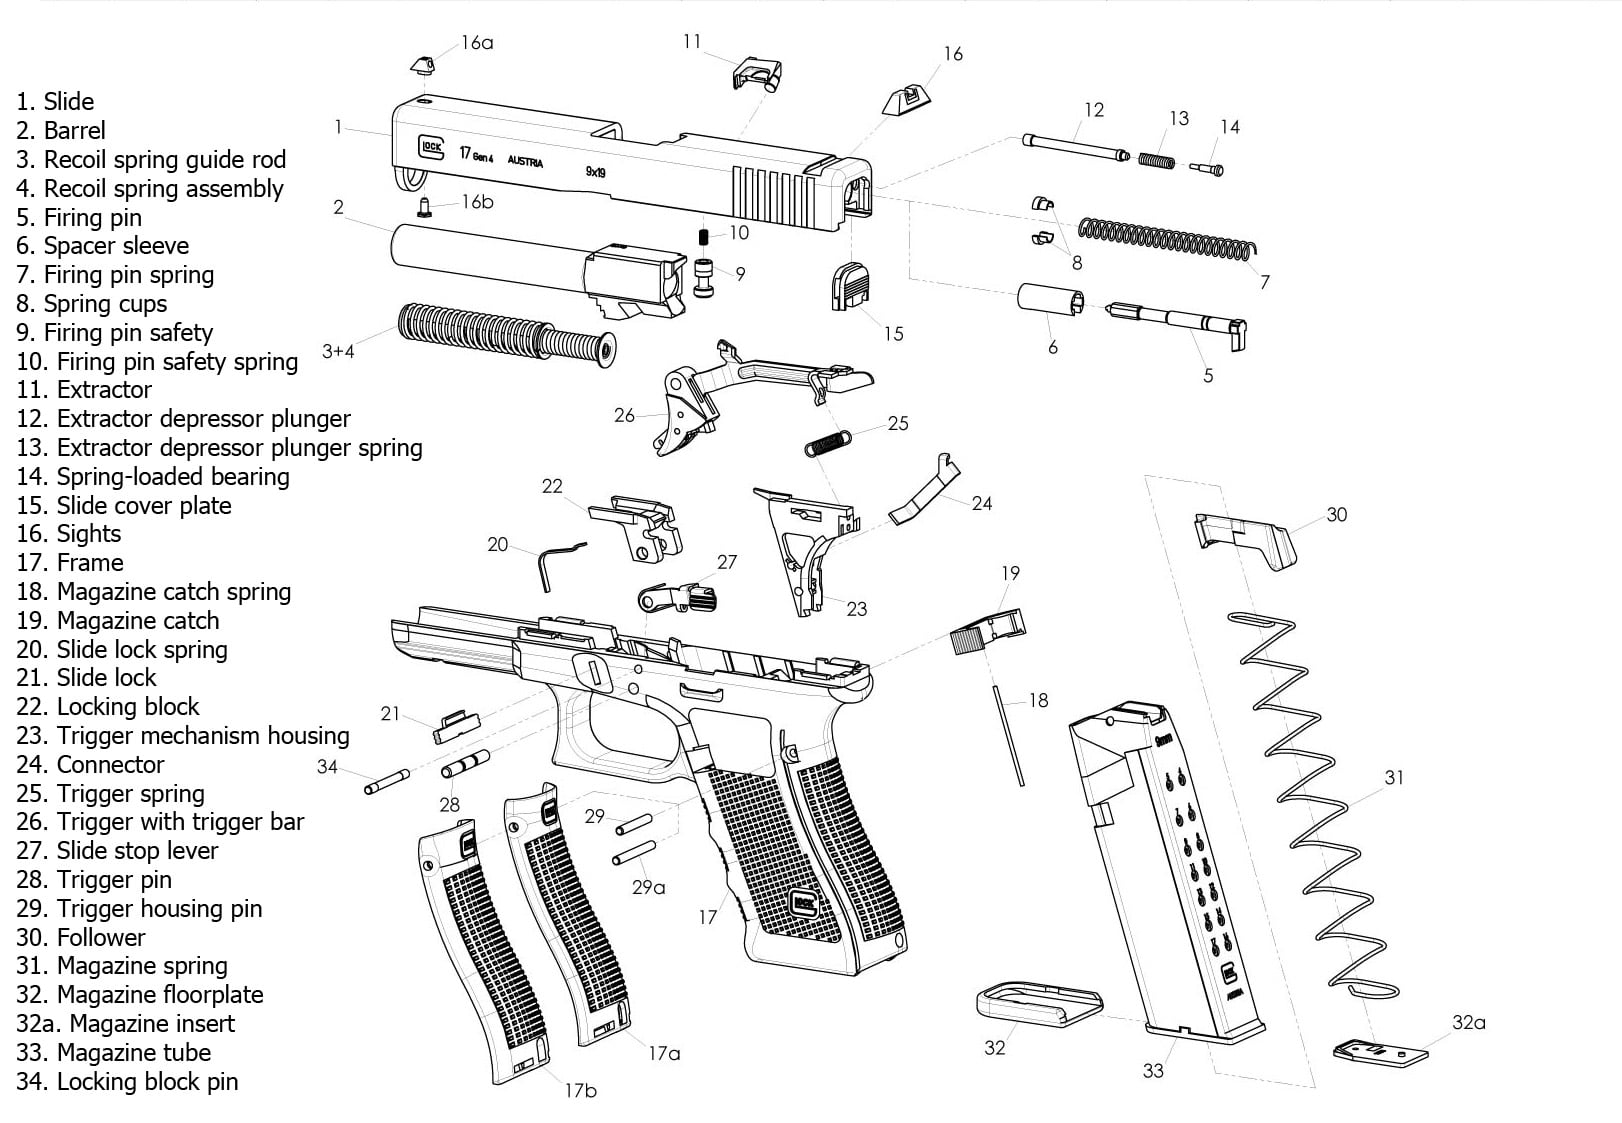
I will speak in terms of the 9/40/.357 small frame Glocks as that is what I am most familiar with; and the size that the majority of Glock shooters will be using. Most of this carries over to the 20/21 as well. If you shoot a .45GAP, I pretend those don't exist so I can't help you, but the same guidance applies. Here is a Glock firearms diagram showing the 33 factory parts, I'll use Glock's nomenclature as a referenced by this chart from Glock (used with permission) throughout the article for uniformity:
26. Trigger with trigger bar
This part interacts with many of the other pieces that we will talk about, and most importantly is the part that interacts with your finger when you fire the pistol.
[singlepic id=4106 w=320 h=240 float=none]The Glock 17/22, 34/35, and 17L/24 come with a smooth faced trigger, left. The 26/27 and 19/23 trigger has vertically oriented serrations. They come this way to comply with BATF firearms import guidelines. Most everyone I know prefers the smooth-faced trigger and frequently swap the serrated version out. The trigger safety is a vertical protrusion in the center of the trigger face. Without pivoting out of the way upon contact with your finger, the trigger is blocked from moving rearward and cannot fire the pistol.
[singlepic id=4094 w=280 float=none]Attached to this pivoting trigger is the trigger bar.The trigger bar is a piece of stamped steel that interacts with the internal components of the striker firing system in such a way that it deactivates the internal safeties and allows the striker to travel the full length of the firing pin channel and detonate the primer of a cartridge. Working from the trigger back the first item of note on the trigger bar itself is a vertical lobe on top of the bar. [singlepic id=4076 w=320 h=240 float=none] This is the point where the trigger bar lifts the firing pin safety (#9). This part is also commonly referred to as the striker block. When the trigger is depressed this ramped lobe moves rearward, pushing up the firing pin safety. As the firing pin safety moves up, it exposes a horizontal slot cut in it's profile that lines up with the firing pin channel and allows free forward travel of the firing pin all the way to the round's primer. This interaction is a key when performing a trigger job and will be addressed later. Moving to the end of the trigger bar, we come to the point where it connects to the aptly named the connector (#24), the trigger spring (#25), and the trigger mechanism housing (#23). [singlepic id=4088 w=320 h=240 float=none] The cross shaped protrusion on the back of the bar retains, cocks, and releases the firing pin (#5) . While the Glock Safe Action has no actual sear, this face of the trigger bar performs the duties of a sear as this is the point that the firing pin is released from.
24. Connector
[singlepic id=4104 w=320 h=240 float=none]Generally when a Glock shooter decides to change the mechanics of his trigger, the first thing they turn to is the trigger connector. The connector is a small piece of stamped metal that changes the felt weight of the trigger pull. It is pressed into the side of the trigger housing and the angle of the broad, bent lip on the connector dictates the force required to cock and release the firing pin. As the trigger bar travels rearward, the rounded edge rides the wide flange on the connector and is forced downward. The steeper the angle, the heavier the trigger will feel.
[singlepic id=4100 w=320 h=240 float=none] The connector should not sit flush against the trigger housing in its channel. It looks like it's bent outward a bit and that's normal. Don't try to bend it to a 90 degree angle. The connector should exert a little outward force on the trigger bar. The small flange at the top of the connector interacts with a track in the slide to release the trigger bar during reset.
***ALL OF THE FOLLOWING WEIGHTS AND FEELS ARE SUBJECTIVE FROM GUN TO GUN TO A DEGREE. THESE ARE STAMPED PARTS, NOT MACHINED AND ARE INCONSISTENT TO A DEGREE IN THEIR FEEL***
Glock produces 3 versions of the connector that I recommend for use in duty/defensive guns. These are the Standard (5.5lb), Minus (4.5lb) and Connector5 (also known as the "Dot" (5lb). Glock makes a couple more that are too rare to be a consideration, or too heavy to matter such as the 8.0lb (+) connector.
[singlepic id=3578 w=320 h=240 float=none] The Standard connector (center) comes in the subcompact guns (26 etc.), compact guns (19 etc.), and full-size guns (17 etc.). It used to be considered 5lbs by Glock but they now sell it as 5.5. It provides a decent pull once broken in and smoothed out. They can be shot well out of the box or given a simple polish job. Either way it's a very reliable trigger.
The Minus connector (left) comes in the 35/35 and 17L/24 sized guns and offers a 4.5lb pull weight (formerly 3.5lb) pull as per Glock tech specs. When used with other factory components it also provides a reliable and shootable trigger.
The Dot connector (right) is a new developed part that works best with the redesigned trigger bar on the Gen4 pistols. It is reported to be a middle ground between the standard and minus connectors due to increased weight brought on by Gen4 trigger bars being changed slightly. When used in conjunction with the Gen3 trigger bar they provide a slightly lighter, crisp break with an positive reset.
The only aftermarket connectors I have found to work well are the non-adjustable Ghost connectors, although I have heard anecdotal reports of the Lone Wolf connectors working well. Of particular note, the Scherer connectors are to be avoided at all costs. When in doubt, seek out Glock factory connectors.
This part is the fastest and easiest way to get a different trigger pull, and can be installed within a few minutes by any Glock shooter.
25. Trigger Spring
The trigger spring is where the "give and take" of the trigger pull can be determined.[singlepic id=4091 w=320 h=240 float=none] The trigger spring connects the trigger bar to the trigger housing via a coiled "S" spring or plastic leaf spring with a captive coil spring (NY series). The interaction of the two springs is not exactly the same but their basic functions are similar, we'll skip the engineering lesson. It's enough to understand that the trigger spring actually pulls the connector to the rear of the gun. The heavier the the spring, the more it helps you pull the trigger.
The heavier (sold as "lighter" due to their effects on the pull) the trigger spring, the lighter the trigger pull. The "lighter" spring makes it easier to apply force to the trigger and move the trigger bar, but as a result the "lighter" spring counters the movement of the trigger to reset. A "heavier" (actually lighter) spring results in a heavier trigger pull but the reduced resistance of the spring snaps the trigger back with more force.
Confused yet? Good.
I have found that I prefer the Glock factory trigger spring and the more positive reset. I give up no accuracy potential under rapid fire but gain a more positive reset and my splits show improvement with the slightly heavier trigger pull. This can be called shooter preference, but I encourage guys to go on the clock and find out for themselves. I used to be very preoccupied with a light trigger, then I did my due diligence and realized I was faster with the heavier trigger due to it's function after the shot broke.
The NY springs are popular with the (-) connectors to give a 5lb-ish pull with improved crispness over the standard factory setup and a very positive reset. To slightly lighten it, you can remove the coil spring from the olive plastic retainer and leave only the leaf-spring retainer in place. User beware, I do not advocate it but some shooters have found this setup works. Moving to the standard connector AND NY spring is unacceptable for shooting performance. One of my friends is NYPD ESU officer and shoots a stock G19 with the department mandated 12lb (!) trigger like a house on fire. He is the exception, not the rule.
23. Trigger Mechanism Housing
[singlepic id=4101 w=320 h=240 float=none] This housing contains the trigger parts as well as provides a home for your ejector. I don't modify it and only inspect it during detailed strips to make sure it hasn't cracked, warped, grown horns, or lost retention of the ejector. The key here is if you change it, make sure you have the proper ejector for 9 or 40 depending on what you shoot. [singlepic id=4102 w=320 h=240 float=none]You should also be aware that Glock changed the shape of the trigger housing on Gen4 models. The new trigger housing, left, is incompatible with prior generations of Glocks. You can ID it by its narrow, pointy bottom.
This is also where you can take the pre-travel out of your trigger. I do not really recommend this unless it is professionally done so we'll not go into it. It is easy to screw it up and deactivate the safeties on the Glock if you are not a competent Glock armorer, resulting in potential injury, loss of life, legal fees, heckling, or an inability to defend yourself when you need that firearm the most. You wouldn't make your car go 5MPH faster if you knew it would deactivate the brakes, would you?
7. Firing Pin Spring
[singlepic id=4108 w=320 h=240 float=left]This is almost always the cause of Failure to Fire issues with the Glock. Primarily I see this with low end 9mm or USGI 9mm ball. The trigger pull is affected by this spring which is why it is included in the Wolff competition spring kit as well as many aftermarket drop in replacements. The firing pin goes back easier with these lightened springs hence lowering the pressure that must be applied to the trigger to fire the Glock. The other shoe drops when you find out it goes forward with less force as well and it fails to ignite your primer and you wind up racking your slide rather than firing accurate, lethal shots. I DO NOT RECOMMEND YOU CHANGE THIS SPRING TO LIGHTER THAN THE FACTORY WEIGHT, PARTICULARLY IN 9MM GUNS. Just because I haven't had an issue with them detonating .40SW primers in my Federal EFMJ does no mean it will reliably detonate yours. I tried the Wolff competition spring kit in various 9MM guns and never had one that would reliably fire GI 9mm ball with the lightened firing pin spring.
9. Firing Pin Safety (striker block)
10. Firing Pin Safety Spring
The firing pin safety and firing pin safety spring are key components in the safety and reliable function of your pistol. The amount of force it takes to raise this block directly affects the force exerted on the trigger in order to fire the Glock.[singlepic id=4072 w=320 h=240 float=none] Without being raised out of the firing pin channel, the firing pin cannot travel forward to strike the primer. Also, the angle at which it engages the trigger bar directly affects the feel of the trigger pull. If the firing pin safety spring is lightened, the trigger bar has to exert less force on the block to push it up and out of the way of the firing pin. In other words, the trigger pull is lightened. I have had good luck replacing this spring with the Wolff competition spring. This is a place you can alter the weight of your pull without the 2nd/3rd order effects that come after replacing or altering other components. So long as the block travels freely and goes back down when the bar moves back to the reset position you are covered functionally. Modifications to the block itself will be covered during later. The block directly impacts how the trigger pull "feels" mechanically, and it can be altered to offer a smoother trigger pull.
5. Firing Pin ("striker")
The firing pin itself changes the trigger pull because of it's contact with the rearmost section of the trigger bar's horizontal section. [singlepic id=4107 w=320 h=240 float=none]The firing pin has a protrusion on the bottom which is the point where the trigger bar moves it to a fully cocked position before releasing it to strike the primer. Modification to this part will be covered later.
Mods to the Glock trigger system:
I would like to treat this like a recipe book. My recipe for a Glock trigger is as follows, but there are more ways than this to make a reliable trigger for duty or defensive use. This one works for me but I am not married to it. So long as what you do works reliably and safely, there's no right answer for all of us. As a rule, I keep all dimensions and angles the same except for the firing pin safety.
Component List:
-Smooth-faced Gen 3 trigger with trigger bar
-Glock factory (-) connector
-Factory firing pin spring
-Factory firing pin safety
-Wolff firing pin safety spring (or factory, this is not too important to me)
-Factory trigger spring
-Factory trigger mechanism housing
-Factory firing pin (striker)
Trigger & Trigger Bar mods: Anywhere there is metal/metal contact I polish with Flitz and Brasso to a mirror shine. I do this using a Dremel with a felt wheel, lower range RPMs, and lots of patience.
[singlepic id=4082 w=320 h=240 float=none] Connector: Same polishing as above, but I polish all outward facing surfaces of the bar since it's not very big.
Firing pin safety: I round off the angles and mirror polish the whole unit. This creates less of a "wall" as the bar lifts the block and more of a gentle, smooth "hump". I chuck mine up in a drill and contour it on a knife sharpener. I then polish it just as the parts above. Remember, you can take more off but never add more on, and uniformity is your goal here. There are numerous tutorials online for this. If you overdo it, you'll be buying a new one.
[singlepic id=4097 w=320 h=240 float=none]Factory firing pin: I polish the protrusion on the bottom where it interacts with the trigger bar. This further ensures a smooth pull during cocking and a crisp break as the trigger bar releases the firing pin.
That's the magic. That and I shoot the shit out of them. The best trigger job you can do is put rounds down. Last but not least, if your trigger begins to get worse over time, not better, take it apart and clean it before you go spending money on parts. It's likely just gunked up and you'll be really pleased at the returns upon wiping it all down.
Guest Author Jon C. is an active duty US Army Special Forces soldier. Graphic courtesy Glock USA.