As a dedicated office commando, I jump at the chance to pit my high-end blade steel against the boxes and blister packs that cross my desk every day. There's something satisfying about a blade cleanly and effortlessly gliding through cardboard, that I've developed a bit of an obsession with sharpness. But today's wonder steels with their 60+RC hardness ratings, come a cost that is not just monetary. Sharpening them can be a major PITA.
I suck at freehand sharpening. Give me a fine Arkansas stone and a few hours to work on it, and I can turn a Sebenza into the worlds most expensive butter knife. Over the years I've accrued a hodgepodge of stones and clamps from Lansky, DMT and Spyderco to make up for my shortcomings. With these implements, I manage to keep all my knives hair popping sharp and my forearms as smooth as a baby's butt. The Spyderco Sharpmaker is my go-to system for quick touch ups. It's quick and simple to drop the ceramic rods into the guided base. A few swipes against the rods and my semi-dull blades are easily returned to razors as long as the grind angle of the edge matches the preset 30 or 40 degree angles of the sharp maker. BUT, take a new blade with a greater edge angle, or heaven forbid, an edge that's been chipped or damaged, and it might take hours, even days, of wrist-cramping agony to re-profile the steel on even the most aggressive of the Sharpmaker's stones. To regrind an edge to a thinner angle so that it can be maintained on the Sharpmaker, I turn to a clamping system with diamond stones. Enter the "Wicked Edge."
[singlepic id=4143 w=320 h=240 float=none]
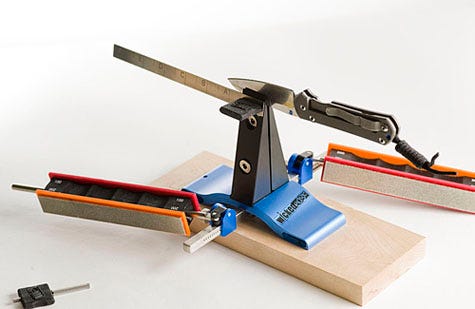
The Wicked Edge uses a vise securely attached to your base of choice to to clamp your blade in a vertical orientation. A marked alignment guide allows repeatable positioning of the knife to assure the same angle each time the blade is reset. A horizontal base rod is marked with grind angles from 15-30 degrees per side. Using hinged collars, a pair of stones are attached on each side so they can be smoothly passed down each side of the blade in a sort of wax-on, wax-off action. Wicked Edge's Website list complete set-up and operating instructions, as well as demo videos detailing how to clamp specific knives and even more advanced techniques like profiling convex edges.
The typical way I profile my knives is to set the original grind at 30 degree inclusive to create a "back bevel" V-grind, then I come back and apply a secondary bevel of 40 degrees. This gives me a durable working edge that is easy to maintain on the Sharpmaker.
I received the Wicked Edge about the same time as my new Chris Reeves Knives Small Sebenza Insingo. Since the CRK came from the factory with a convex edge, instead of my preferred grind, I decided it would be a perfect test of the Wicked Edge system. The basic Wicked Edge kit comes complete with a total of 8 diamond stones, 2 each in 100, 200, 400 and 600 grits. Following the online tutorials, I got the system set up, but quickly ran into problems with the small blade. I used the depth key and alignment guide to set the narrow blade in the top most holes in the vice, and the base angle rod at 15 degrees, but on the first few swipes, I found I was removing paint and metal from the vice itself, instead of from the blade edge. The narrow blade simply set too deep in the vice to allow me to get the preferred 15 degree angle. Bummer, but I found that moving the stones out to 17 degrees finally made contact. Then, it was a matter of moving the blade fore and aft, while using a sharpie on the bevel to find the "sweet spot" on the alignment guide that would give me an even bevel from tip to rearmost edge.
[singlepic id=4140 w=320 h=240 float=none]
From there things went pretty smoothly except for one occasion when the thumbscrew on the collar that holds the stones in position slipped. Luckily I caught the problem before I ground much material. I went slow to get the unique scrubbing motion down, and progressed through the stones from 100 to 600 grits to create the desired 30 degree back bevel. The process went much faster than I expected re-profiling the S35V steel and the results were ALMOST perfect. The grind was a little shallower at the tip and the belly than at the base of the blade, but the little Sebbie was sharp enough to pop what little remaining hair I had off my forearm. I could have then simply moved the stones out to 20 degrees on each side to get the final 40 degree bevel I wanted, but since I planned on doing my maintenance on the Sharpmaker, I went back to old faithful for that finishing touch, but am still impressed with how quickly the Wicked Edge had cut the new grind. [singlepic id=4146 w=320 h=240 float=none]
According to their site, Wicked Edge claims to have corrected the few issues I had with my kit on the newest versions. The taller vise may cure my issue of not being able to get a 15 degree setting with narrow blades. They also claim that new indentations along the base rod will keep the collars from slipping. I can't wait to get my hands on a new one but even at the base price of $250.00, these kits are currently back-ordered. This kit does NOT include a base. We fitted ours on a 1x4 pine plank and use clamps to attach the whole shebang to a sturdy table edge, but buyers can purchase their own base from a variety of materials ranging from wood to granite for an additional $45-75. Additionally, I think that most users investing this much in a sharpening system are going to want a more polished edge than the 600 grit stones will provide. A variety of Fine Diamond, Ceramic, leather strops and even Chosera water stones are available to dial in the finish you desire ranging from $60 per set to $175 for the finest Chosera stones.
My conclusion, the Wicked Edge is an excellent tool for re-profiling, or repairing damaged blades. Thanks to the alignment guide, the results are perfectly repeatable every time. Given a dedicated workbench where the system could be left assembled, it would make short work of bringing all your knives to "wicked sharp."
[nggallery id=491]


