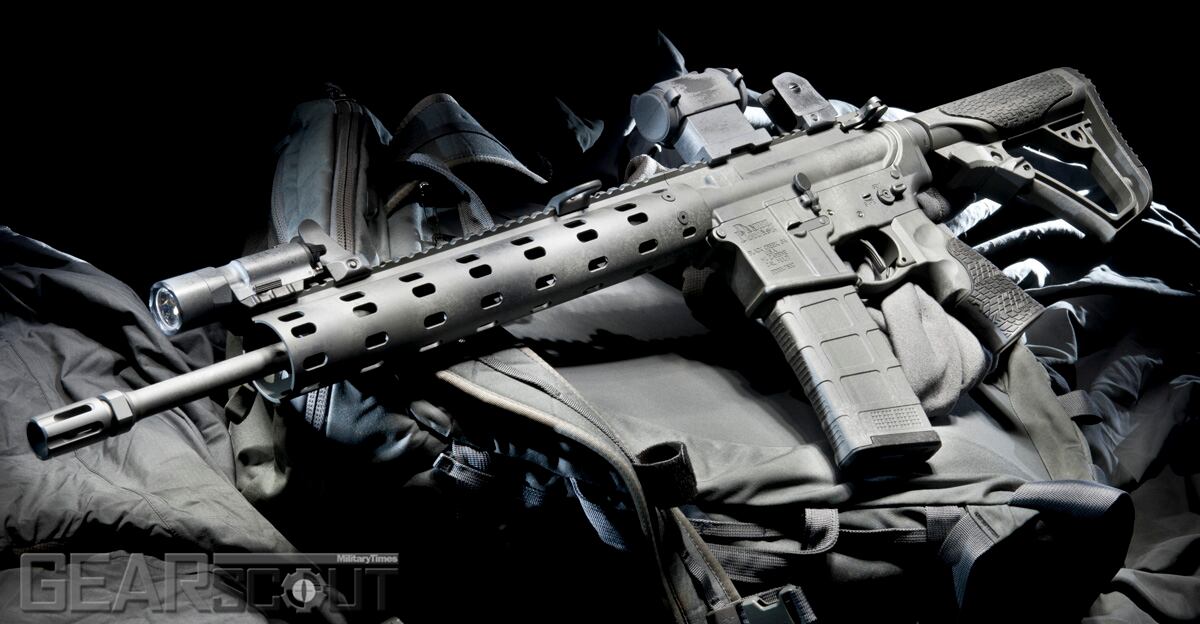
I gotta say, this thing came out wonderfully. I sent my Daniel Defense DDM4 V7 lightweight out to Legendary Coatings in Oregon a couple weeks ago for a date with former in-house Cerakote professor Jesse Ruiz. Ruiz started his own shop after leaving Cerakote and has quietly become one of the best kept secrets in the coating business.
He's a meticulous pro, his is work is flawless and he's eager to indulge his patron's ideas with his own artistry. I sent the disassembled rifle out to the shop (they have an FFL) with some vague instructions asking for a very subdued camo pattern using a series of grays. I was a little worried I didn't offer enough direction, but when I got the rifle back 10 days later, all doubt vanished as each individually bagged part came out of the express shipping box looking exactly as I had hoped.
more
There were a couple of reasons I chose to go with Cerakote instead of spray paint or other coatings. The first was for corrosion protection. I remember looking at a rifle in a friend's collection and marveling at the rust and pitting that had developed during years of seaside living despite a normal maintenance cycle. I'm not even close to meticulous when it comes to taking care of my guns, so I look at Cerakote as a way to shortcut the cleaning and lubing process. Bad. I know. But thank God, science has an solution for everything.
The second reason? I wanted a rifle that was clearly mine. I chose the color of my truck. I choose the color of my shoes... so why do I have to settle for a Black Rifle? I was going to get it coated anyway, so why not have a little fun? Not pink ponies and twinkling stars kinda fun, but that's out there for those that want it!
As per his instructions, I spent 2 hours pulling every part of that rifle apart before shipping it out to Ruiz. When I got it back there were a few pins and springs I didn't recognize. It turns out I didn't bother pulling apart the stock's latch and he disassembled it to make sure the Cerakote got everywhere it was supposed to. Service.
And, look at the masking on the rubber grip areas. I know he must have rolled his eyes when he saw those! But, again. Flawless. B.A.D. Selector levers? Coated. Geissele Super Tricon trigger? Coated. Trigger and hammer pins? Coated; and they somehow slipped right back into place with barely any more friction than their pre-coated state. That's a surgically applied coating.
Every part was degreased and sandblasted, including the polymer parts. Ruiz said it's a common misconception that the polymer parts don't take Cerakote well because they feel a little different after coating. On the contrary, he said the coating penetrates and bonds with the polymer in such a way that the coating becomes integral to the part.
The only area that needed some attention on reassembly were the takedown pins. The pins on the V7 were somewhere between snug and tight before I sent it to Legendary Coatings. When it came back, those pins had to be pushed in with a few hard palm taps. I expected this after talking to Ruiz. He explains that, while the coating is very thin, it's there. He said he can use that micro thickness in key areas of the rifle to tighten up loose fitting parts.
But, on rifles that are already tight, the thin coating can make things very tight. He said to just work the pins back and forth to conform the surface of the coating to the dimensions of the mating part. I did that... after hitting the shafts of the takedown pins with a 1000 grit sandpaper for a few seconds each to jumpstart the process. Then, I sat down in front of the TV with the (verified clear!) rifle in my lap and worked the pins in and out like an Ikea robot drawer tester. The pins gradually loosened up to normal clearance over the course of an episode of Game of Thrones.
Ruiz coated the bolt carrier group in a high heat 'C-series' gray Cerakote. He says it's an industrial coating that he's used to coat the cylinder walls of his car engine. It's formulated to reduce friction, but I'm hoping it combines with a base coat of FireClean to produce a self-cleaning rifle.
The only part of the rifle that he didn't coat were the iron sights. He says he rarely works on sights because they are often difficult, if not impossible to pull apart and reassemble. Irons are often heavily lubricated during manufacturing, and if those parts can't be pulled apart, degreased, sandblasted and cleaned, then he says it's likely the coating will fail. He'd rather tell his clients that he won't work on sights up front instead of dealing with unhappy clients should the coating flake off a few years down the road.
Having said that. I went ahead and rattle-canned the sights, the Aimpoint Micro T-1 IO Cover, LaRue mount and the SureFire X300. I used some Rustoleum flat gray primer from Home Depot and covered it in a very light mist of flat black in an attempt to match Ruiz's work.
Painting those four parts took me about an-hour-and-twenty minutes to get looking this good. I was feeling okay until I asked Ruiz about how long it takes to paint a rifle. He tells me he sandblasted, masked and base coated my entire rifle in about an hour-and-a-half.
Now, I'm good at some things, but one of the things I truly excel in is deciding when to bring in a pro. Clearly, Cerakote, just like teaching my wife to ski, was worth the expense of bringing in a pro. Legendary Coatings charges about $260 for a simple, single or two-tone coating (not a camo application). They charge $300 for a multicolor, freehand camo job like this on a dissembled AR. That's a 20% add-on to the cost of a $1500 rifle. That's too much for me if it were just making the rifle pretty. But, it's adding life, durability and, by some accounts, reliability to the rifle. With that in mind, I think it's worth it.